
Reference rendering of this structure. Artwork, material and final dimensions are confirmed for your project.
Custom Die-Cut Handle Paper Bags
A gusseted paper bag with handle openings cut into the front and back panels. Plan the print area below the grip and the base around the packed contents.
- Style reference
- E60013
- Structure
- Die-cut handle · side gussets · folded base
- Dimensions
- Custom size, confirmed for your product
- Material
- Kraft paper appearance shown; paper weight and handle reinforcement to confirm
Size around your product.
Measure the contents together and leave headroom below the handle openings.
- L
- Front widthThe horizontal span across the assembled front panel.
- W
- Gusset depthThe front-to-back depth when the side gussets are opened.
- H
- Body heightThe distance from the base to the top edge; the handle area reduces usable filling height.
The full body height is not available for contents. Confirm the bottom folds, handle position and any reinforcement.
Add your target size
Your values appear on the diagram and in your inquiry. The reference drawing stays at its original proportions.
Design for the finished product.
The two broad body panels contain matching handle cut-outs. Narrow folded strips create the side gussets, and the lower sections form the base.
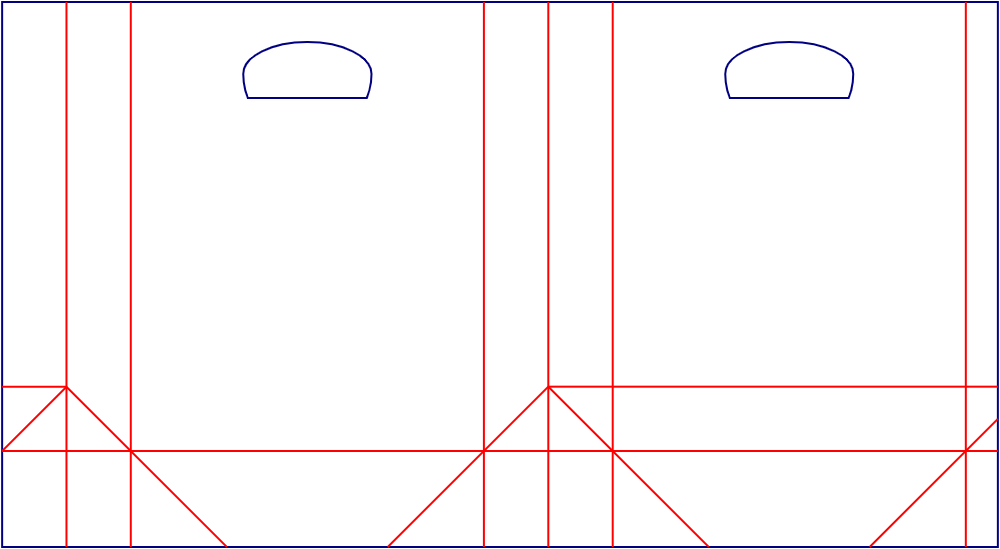
Place the main design below the handle.
Use the broad faces for a clear logo or image, leaving enough uninterrupted space around the grip.
- Do not place text in the handle cut-out.
- Check both faces when the bag is filled.
Use the side folds for a simple continuation.
A background colour or repeating pattern can continue into the side gussets.
- Keep small text away from the central gusset crease.
- Check how the pattern looks open and folded.
Allow for overlapping glued areas.
The bottom folds overlap during assembly, and the side seam needs a clear attachment area.
- Mark concealed areas before artwork approval.
- Keep key logos above the bottom fold line.
Prepare artwork on the approved production dieline at final size. Confirm bleed, print sides and safe margins before printing.
Request a production dielineTry your artwork on this reference
Select an area on the reference, add text or your logo, then adjust its direction and repeat pattern. Download a placement preview to include with your inquiry.
No target size added. Add your dimensions to include them in the preview.
Use the position fields as an alternative to dragging. Values are percentages of this reference image.
Loading the reference…
A placement concept, not a print-ready file. Confirm print sides, cutouts, glue areas and safe margins on your production layout. Your uploaded image stays in this browser.
- Keep the layers separate.
Place the dieline on its own reference layer. Keep it out of the printed artwork unless your production file instructions say otherwise.
- Check the reading direction.
Review logos and text in the finished orientation. Carry patterns across folds only after checking their alignment.
- Approve a physical reference.
Use the appropriate sample to check fit, opening and print position before confirming production.
Request a quote for this style.
Send your dimensions, quantity and artwork requirements for style E60013.
- Target size and measurement basis
- Quantity, product details and intended use
- Logo, artwork and finishing ideas
Need to check it in hand? Explore sample options ↗
Recommended sizes & materials for common products.
Dimensions give front width × gusset depth × body height. Leave the upper handle area clear when checking the packed product.
| Product & example size | Suggested bag body dimensions, including handle headroom | Material to consider | Selection & fit notes |
|---|---|---|---|
| A small boxed accessoryExample packed product: 120 × 60 × 100 mm |
145 × 80 × 180mm · L × W × H | Kraft paper | Leave room around the box and below the handle opening. |
| A wrapped stationery setExample packed product: 180 × 70 × 150 mm |
205 × 95 × 235mm · L × W × H | Kraft paper | Check the contents' height against the lowest edge of the grip. |
| A folded scarf giftExample packed product: 220 × 90 × 160 mm |
250 × 115 × 250mm · L × W × H | Kraft paper | Measure the tissue-wrapped fold and confirm the handle reinforcement. |
| A lightweight boxed giftExample packed product: 260 × 100 × 190 mm |
290 × 125 × 280mm · L × W × H | Kraft paper | Check the filled weight, base assembly and grip before confirming paper grade. |
These are illustrative design starting points, not fixed stock sizes or confirmed production specifications. Example product dimensions include the planned wrapping. Confirm the complete pack, material grade and fit with a sample. A die-cut handle requires a load check; no carrying capacity is implied by the size or paper appearance.
Discuss your size & material