
Reference rendering. Printing, material and final dimensions are confirmed for your project.
Custom Flap-Top Mailer Boxes
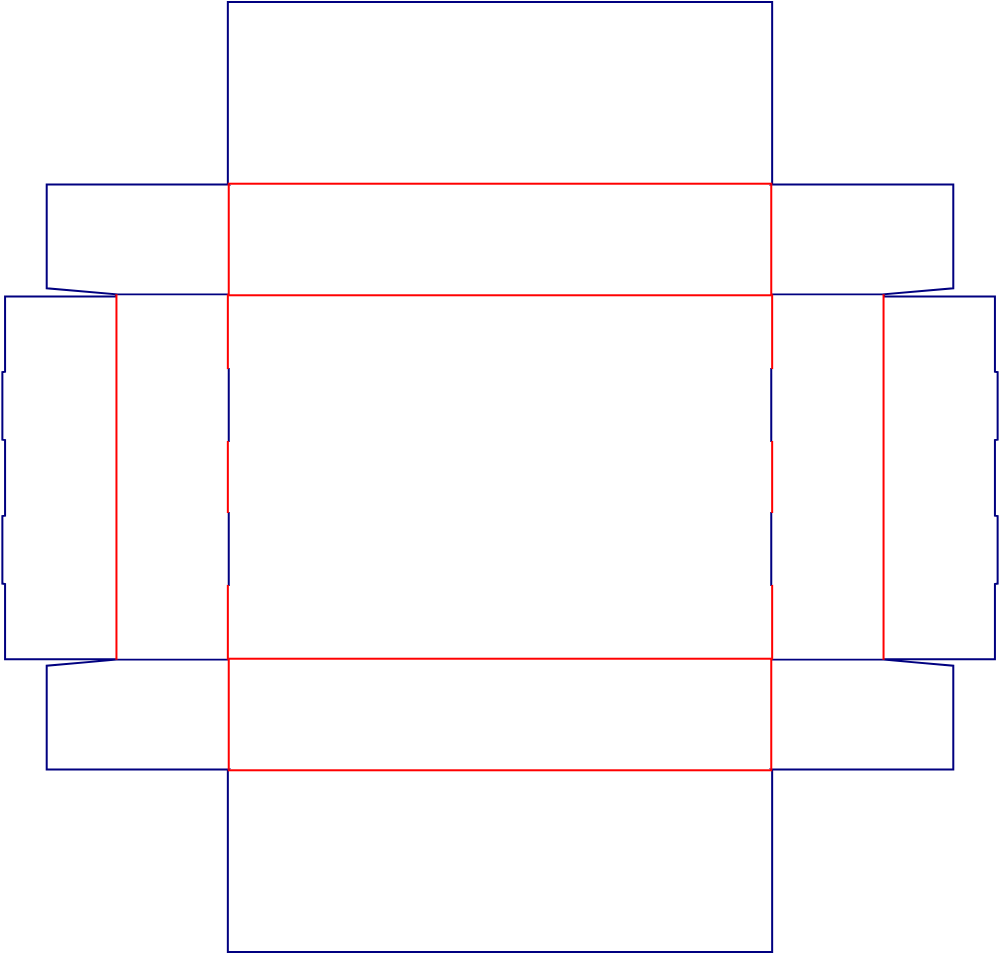
A low-profile mailer with two broad closing flaps and folded side walls. Start with the structure, then plan your dimensions and printed panels.
- Style reference
- E60001
- Structure
- Two closing flaps · folded side walls
- Dimensions
- Custom size, confirmed for your product
- Material
- Kraft appearance shown; board specification to confirm
Size around your product.
Start with the product and everything packed alongside it. Specify the usable internal space or clearly identify external measurements.
- L
- LengthThe longer side of the assembled base.
- W
- WidthThe front-to-back distance across the assembled base.
- H
- HeightThe depth from the base to the closed top flaps.
Include inserts and protective wrapping when checking fit. Board thickness and folded walls affect the usable space.
Add your target size
Your values appear on the diagram and in your inquiry. The reference drawing stays at its original proportions.
Design for the finished product.
The large centre panel becomes the base. The two broad panels at the outer ends close over the top. Select a region to plan the artwork.
Give the main logo a clear home.
Place the primary logo on one closing flap and check its position with both flaps closed.
- Keep important lettering clear of the centre opening.
- Check any pattern crossing the opening on an assembled sample.
- Confirm the orientation of both flaps before approving artwork.
Let the smaller panels support the story.
Use the front and rear wall panels for a short message, website or a continuation of the background.
- Keep the reading direction consistent after folding.
- Leave room around folds and closure details.
- Confirm which side faces outward on the assembled sample.
Plan the underside separately.
The central rectangle is the base. Reserve this area for secondary information or a considered background treatment.
- Confirm the intended inside and outside print surfaces.
- Check the orientation of any underside text.
- Keep the base artwork separate from the top-flap logo placement.
Prepare artwork on the approved production dieline at final size. Confirm bleed, print sides and safe margins before printing.
Request a production dielineTry your artwork on this reference
Select an area on the reference, add text or your logo, then adjust its direction and repeat pattern. Download a placement preview to include with your inquiry.
No target size added. Add your dimensions to include them in the preview.
Use the position fields as an alternative to dragging. Values are percentages of this reference image.
Loading the reference…
A placement concept, not a print-ready file. Confirm print sides, cutouts, glue areas and safe margins on your production layout. Your uploaded image stays in this browser.
- Keep the layers separate.
Place the dieline on its own reference layer. Keep it out of the printed artwork unless your production file instructions say otherwise.
- Check the reading direction.
Review logos and text in the finished orientation. Carry patterns across folds only after checking their alignment.
- Approve a physical reference.
Use the appropriate sample to check fit, opening and print position before confirming production.
Request a quote for this style.
Send your dimensions, quantity and artwork requirements for style E60001.
- Target size and measurement basis
- Quantity, product details and intended use
- Logo, artwork and finishing ideas
Need to check it in hand? Explore sample options ↗
Recommended sizes & materials for common products.
Choose a starting size around the complete packed product. The examples below pair practical internal dimensions with a material to discuss for your custom mailer.
| Product & example size | Suggested box internal dimensions | Material to consider | Selection & fit notes |
|---|---|---|---|
| Greeting cards & small stationery setsExample packed product: 160 × 120 × 25 mm |
180 × 140 × 40mm · L × W × H | Kraft-faced E-flute corrugated board | A natural kraft appearance with room to discuss a paper wrap or band around the set. |
| A5 notebooks & stationery gift setsExample packed product: 220 × 160 × 35 mm |
240 × 180 × 50mm · L × W × H | White-faced E-flute corrugated board | A white print surface for colourful branding. Check the complete stack, including pens or accessories. |
| Small apparel accessoriesExample packed product: 200 × 140 × 35 mm |
220 × 160 × 50mm · L × W × H | Kraft-faced E-flute corrugated board | A compact starting point for fabric accessories. Review the folded shape and any loose-item restraint. |
| A folded T-shirt or lightweight garmentExample packed product: 280 × 220 × 40 mm |
300 × 240 × 60mm · L × W × H | Kraft-faced E-flute corrugated board | Room for the folded garment and tissue. Recheck the envelope for each garment size and fold. |
Dimensions are suggested design starting points, not fixed stock sizes. Example product sizes include the planned contents and wrapping. Confirm the board grade, closure, packing method and sample fit before production; transit performance depends on the complete pack.
Discuss your size & material